Time needed: 1 hour
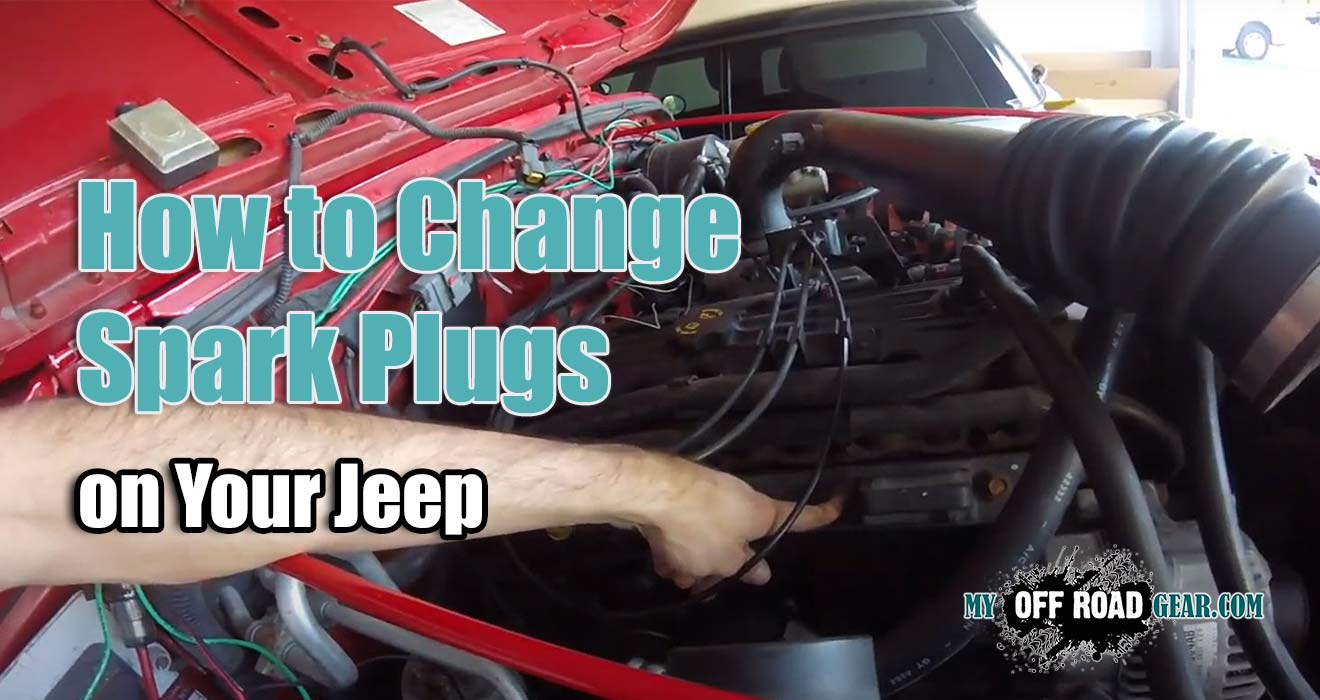
If you own a Jeep and you’re experiencing rough idling, misfires, or a decrease in fuel efficiency, it might be time to change your spark plugs. Spark plugs play a crucial role in the ignition process of your engine, providing the necessary spark to ignite the air-fuel mixture. Over time, spark plugs wear out and need replacement to ensure optimal performance. In this comprehensive guide, we will walk you through the process of changing spark plugs on your Jeep, step-by-step. So let’s dive in and learn how to change spark plugs on your Jeep like a pro!
-
Getting back to basics
We all enjoy trying to come up with a decent write-up on lift kit installs or front bumper installations, but you still end up back at the basics when it comes to the engine. Sometimes even the basics can be overwhelming to the novice tuner. With the current growth of offroading and the influx of new Jeepers, both guys and gals, and with Jeeps coming out of the factory plenty capable as they are…..well let’s just say that there is a lot of inexperienced novice Jeepers out there. So this is for them, and if any of you more experienced folks out there get something from this, even better.
Changing spark plugs ain’t that hard. Right? No, not really, especially when your rig is newer. Many years ago, I learned this procedure with plug swaps. There will be a few extra steps taken that in the long run can make that plug change 100,000 miles from now go smoothly. This installation pertains to the 4.0 L6 engine.
-
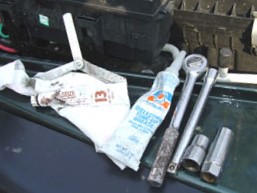
Tools and supplies for spark plugs installation
To get started with changing the spark plugs on your Jeep, you’ll need a few tools and materials. Here’s a list of what you’ll need:

- Socket wrench
- 6″ extension
- 13mm socket
- 5/8″ Spark plug socket
- New spark plugs (make sure they are compatible with your Jeep’s make and model)
- Feeler gauge
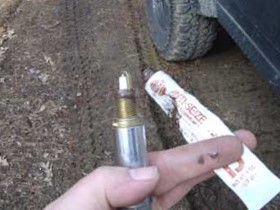
- Anti-seize
- Dielectric grease
- paper towels or rags
- I use but didn’t show a pic……flex knuckle
-
Pick your poison
There are a lot of different brands of spark plugs out there. Many different flavors and prices. I won’t recommend any particular brands. I will say that it’s been my experience that the expensive gimmicky ones are just that, expensive and gimmicky, but I haven’t seen any true gains from them. Also, avoid cheap import “X” brands. They’re not consistent at all. For my swap, I picked up Champion Iridium Spark Plugs on Amazon.

-
Preparing your Jeep
Before diving into the spark plug replacement process, it’s essential to prepare your Jeep. Follow these steps:
- Park your Jeep on a flat surface and engage the parking brake.
- Allow the engine to cool down completely to avoid any burns.
- Open the hood and locate the battery. Disconnect the negative terminal to prevent any electrical mishaps during the process.
-
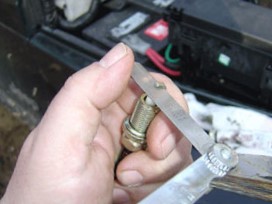
What’s the gap?
Installing new plugs without checking and correcting the gap is just a waste of time, effort, and money. The gap is important for consistency for the fuel burn in the cylinders. Running too narrow of a gap and the flame kernel will get squashed and doesn’t give a good burn. Too wide of a gap causes miss fires. The spark may decide to start jumping to the cylinder wall or piston dome, either of which causes hot spots. Hot spots inside the cylinder burn off the incoming fuel charge before the plug fires.

The recommended gap for Jeep Wrangler TJ is .035 or 35 thousand an inch.
You want the gauge to slide between the electrode and the ground with a little resistance. If it’s too wide, tap the end gently to close. Too narrow, then just pry up on the ground to open. Gap all 6 and set them aside. If you drop any, check the gap again and make sure the ceramic didn’t break.
-
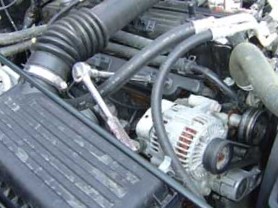
Open that hood! – Removing the old spark plugs
I like to lay the hood back against the roof. If it’s windy, bungee it in place so that it can’t close on you. You can use the prop, but I find that it makes getting to the rear plugs difficult.

If you have an earlier model built prior to 2005, you will notice a couple of major changes have been made. Gone are the distributor and plug wires that were replaced by a distributor less ignition and spark plug power rail. There are many bonuses to this new setup. All it used to take was water on the wires or a hairline crack in the distributor cover to leave you stranded. No more having to pay attention to what wire came from what spot on the cap.
At this point, if you do have a model with plug wires, I recommend only changing one plug at a time so that the wire order doesn’t get confused.
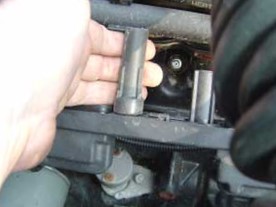
If you have the power rail, it will need to come off so that you can get to the spark plugs. There are 2 bolts at the front and 2 at the rear. Use the 13mm socket wrench to remove these.
Watch out for the red wire on the alternator hiding just under the socket wrench. Hit that by accident and you could weld the wrench to it.
There is a bolt just under the tube from the airbox to the Throttle Body. You can either remove the tube or use a wrench or swivel to remove that bolt. After removing the 4 bolts, grab the power rail from both ends and wiggle, and pull until it comes loose. It can fight a bit until the suction of the boots lets go of the plugs. It’s wired into a harness and wont go anywhere so just let it sit out of the way.

Use the 5/8″ spark plug wrench and remove the old plugs. There is a difference between a spark plug socket and a deep well socket. Spark plug sockets are tapered inside to help support the plug and a rubber grommet to help center and hold the plug from dropping out when you turn the socket with the plug end down. It’s amazing how easy you can to break the ceramic with a standard 5/8″ deep well socket.
-
Inspecting the spark plugs
Inspecting the old spark plugs can provide valuable insights into the condition of your engine. Here’s what to look for:
- Check the electrode: A worn-out spark plug will have a rounded or eroded electrode. Ideally, the electrode should have a flat surface and a gap according to your Jeep’s specifications.
- Examine the insulator: Inspect the insulator for any signs of damage, such as cracks or excessive carbon buildup.
- Check the color: A normal spark plug should have a light tan or grayish color. If the spark plug is covered in black soot, it indicates a rich fuel mixture.
-
Anti-Size does just like says
I learned many years ago that using these two products properly can make servicing vehicles a pleasure instead of a pain.

It keeps threads from seizing or freezing so that the bolts can be removed more easily in the future. I put a very small dab on the spark plug threads before threading them in.
-
Take some care and hand thread the plugs in
Don’t cross-thread the plugs. Cross threading is easy to do when you’re working in tight spaces at odd angles. So thread them in till they stop. There are 2 different methods of seating plugs. This depends on how they’re made. Some use a washer or gasket. You only tighten these a 1/2 turn with a socket wrench from the point where they’re hand seated into the head. The other type has only a bevel and this type requires only 1/16 of a turn past hand tight with a wrench.

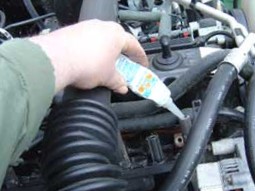
The next important step is by putting a small amount of dielectric grease or tune-up grease into the spark plug boots. Dielectric Grease is great stuff. It’s made specifically for electrical connections that are subjected to extreme conditions or elements. It will keep out moisture and promotes conductivity. It also keeps the boots from cooking themselves on. This will be important in 30,000 miles when you are trying to install new plugs again. It makes the boots come off nicely without tearing.
Push the rail back onto the spark plugs. Then put a dab of anti-seize on the rail bolts and thread them back in. Hand tightens and torque to 20 ft pounds.
Well, that’s about it, you’re done with this. I can’t stress enough the importance of using the Anti-Seize and Dielectric Grease. It really will make that next change go potentially a lot easier. Nothing worse than having a torn plug boot or have a wire tear out or one of the plugs frozen in.
-
Replacing the Spark Plug Wires
While changing the spark plugs, it’s a good idea to replace the spark plug wires as well. Here’s how to do it:
- Start with the first spark plug wire. Firmly grip the boot at the spark plug end and twist it to break the seal.
- Gently pull the spark plug wire away from the spark plug.
- Repeat this process for all the spark plug wires.
- Install the new spark plug wires in the reverse order, ensuring each wire is securely connected to both the spark plug and the distributor.
-
Reassembling and Testing
With the new spark plugs and wires installed, it’s time to reassemble everything and test your Jeep. Follow these steps:
- Reconnect the negative terminal of the battery.
- Put the engine cover back in place if you removed it earlier.
- Start your Jeep and listen for any abnormal noises.
- Take your Jeep for a short test drive to ensure smooth acceleration and no misfires.

Conclusion
Changing the spark plugs on your Jeep is a task that can significantly improve your vehicle’s performance and fuel efficiency. By following the steps outlined in this guide and taking the necessary precautions, you can confidently change the spark plugs yourself. However, if you’re unsure or uncomfortable with the process, it’s always best to seek professional assistance. So go ahead, give your Jeep the care it deserves, and enjoy a smoother and more efficient driving experience!
FAQs
How often should I change the spark plugs on my Jeep?
It is generally recommended to change spark plugs every 30,000 to 50,000 miles, or as specified in your Jeep’s owner’s manual. However, if you notice signs of wear or decreased performance, it’s best to change them sooner.
Can I use any type of spark plugs for my Jeep?
No, it’s important to use spark plugs that are specifically recommended for your Jeep’s make and model. Using the wrong spark plugs can lead to poor performance and potential engine damage.
What are the signs of worn-out spark plugs?
Some common signs of worn-out spark plugs include rough idling, misfires, reduced fuel efficiency, difficulty starting the engine, and a noticeable drop in acceleration.
Can I change the spark plugs myself or should I go to a mechanic?
Changing spark plugs is a relatively straightforward task that can be done by most car owners. However, if you’re not comfortable with basic engine maintenance or lack the necessary tools, it’s recommended to consult a mechanic.
What is the recommended spark plug gap for Jeeps?
The spark plug gap for Jeeps can vary depending on the specific model and engine. Refer to your Jeep’s owner’s manual or consult a trusted mechanic to determine the correct spark plug gap for your vehicle.
Are there any precautions I should take while changing spark plugs?
Yes, here are a few precautions to keep in mind:- Always disconnect the battery’s negative terminal before starting any work.
- Allow the engine to cool down completely before removing the spark plugs.
- Use dielectric grease to prevent moisture and aid in future removal.
- Double-check the torque specification when tightening the spark plugs to avoid over-tightening or under-tightening.
I appreciate the tips on choosing the right spark plugs. It’s a small detail that can make a big difference. Are there specific brands you recommend for the 4.0L engine?
NGK, Bosch, and Champion offer reliable spark plugs for the 4.0L engine, enhancing performance and fuel efficiency. Make sure you choose the iridium one!